Cara Aktivasi Office 2013 Permanent

Advertise with Anonymous Ads

Cara Aktivasi Office 2013 Permanent apakah benar activator ini bisa buat office 2013 kita menjadi permanent. admin sudah mencoba dan akhirnya office menjadi aktif selamanya.

untuk yang penasaran silahkan sobat mencobanya dengan mendownload ldi link di bawah ini activator cuma 8 mb

Download Aktivator Office 2013 Permanent
          
                       atau Via Indowebster

                 Aktivator Office 2013 Permanent

Password RAR : balack-redevil.blogspot.com

Cara Aktivasi

1. Instal dulu office 2013
2. run as administrator install cmd yang ada di folder 8OAT15
3.tunggu hingga proses selesai
4. run as administrator install cmd yang ada di folder 15SSFP
5. selesai
6. sekarang office 2013 sobat sudah aktif selamanya.

Source : http://balack-redevil.blogspot.com/2013/07/cara-aktivasi-office-2013-permanent.html#comment-form

Related Posts:

    Mempercepat Koneksi Internet Dengan gpedit.msc

    Advertise with Anonymous Ads

    Sedikit tips agar koneksi Anda lebih cepat dari sebelumnya :
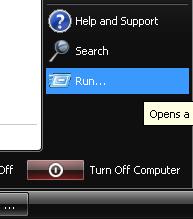
    • Klik Start,lalu pilih run

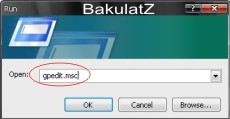
    • Ketikkan gpedit.msc,maka akan muncul jendela group policy

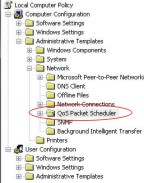
    • Lalu pilihlah Local Computer Policy–>Computer Configuration–>Administrative templates–>Network–>QoS Packet Scheduler

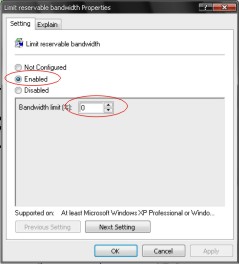
    • Pada jendela kanan terdapat Limit Reservable Bandwidth

    • klik 2 kali,dan pilihlah setting Enable,ganti Bandwidth Limit menjadi 0%

    • Klik Apply, Ok, dan Tutup
     Source : http://bakulatz.wordpress.com/2011/05/13/mempercepat-koneksi-internet-dengan-gpedit-msc/

    Related Posts:

      Beberapa Fungsi dan Cara Penggunaan gpedit.msc di Windows 7

      Advertise with Anonymous Ads
      Gpedit.msc adalah sebuah program tempat konfigurasi yang didalamnya memuat semua tentang semua pengaturan yang terdapat pada system operasi. Beberapa fungsi dari program ini adalah sebagai cara alternatif, cepat dan rahasia untuk mengganti settingan .   

      Ada beberapa pilihan bila sobat ingin membuka program ini, diantaranya :
      1. Buka dengan RUN (Windows+R) ketikan gpedit.msc
      2. Buka dengan Command Prompt (DOS) lalu ketikan gpedit.msc 
      3. Buka drive C:\Windows\system32\gpedit.msc
      4. Klik kanan pada desktop atau Windows Explorer pilih New Shortcut, Ketik gpedit.msc pada kolom type the location of the item, klik next untuk type name isikan nama shortcut, finish

      Semua list settingan terdapat 3 pilihan, yaitu :
      • Enable(Aktifkan)
      • Disable(Non-Aktifkan)
      • Not Configured(Tidak Diatur)


      Cara Mengunci Desktop Background
      User Configuration |> Administrative Template |> Control Panel |> Personalize |> Prevent
      Changing Desktop Background

      Cara Mengunci Mouse Pointer
      User Configuration |> Administrative Template |> Control Panel |> Personalize |> Prevent
      Changing mouse Pointer

      Cara Mendisable Akses Regedit (registry editor)
      Buka User Configuration |> Administrative Template |> System |> Prevent access to registry editing tools

      Cara Menyembunyikan/Hidden Drive (Seperti C,D,E)
      Buka User Configuration|>Administrative Tools|>Windows Component|>Windows Explorer|>Hidden 
      These Spesified Drive in My Computer

      Cara Mendisable Akses ke Drive (seperti C,D,E)
      Buka User Configuration|>Administrative Template|>Windows Component|>Windows Explorer|>Prevent
      Access to Drive from My Computer

      Cara mendisable Akses Klik Kanan Desktop
      User Configuration |> Administrative Template |> Windows Component|>Windows Explorer|>
      Remove Windows Explorer Default Context Menu

      Cara Mendisable Akses My Computer-Manage
      User Configuration |> Administrative Template |> Windows Component |> Windows Explorer –> 
      Hides The Manage Item On The Windows Explorer Context Menu

      Cara Mendisable Task manager/ Lock Computer/Change Password/ Log Off:
      User Configuration |> Administrative Template |> System |> Ctrl + Alt + Del Option Kemudian akan ada 4 opsi :
      Remove Task Manager
      Remove Lock computer
      Remove Change Password
      Remove Log Off

      Cara Mendisable Autoplay Fiture
      User Configuration |> Administrative Template |> System |> Turn Of Autoplay |> Pilih  Disk Drive

      Cara Menghapus History atau Recent Document
      User Configuration |> Disk Administrative Template |> Start Menu and Taskbar |>
       Clear History of Recently Documents on Exit

      Cara Menghapus LogOff dari Start Menu
      User Configuration |> Administrative Template |> Start Menu and Taskbar |> Remove Logoff  on The Start menu


      Source : http://perilian.blogspot.com/2013/09/fungsi-cara-atur-gpeditmsc-di-windows-7.html

      Related Posts:

        ESET 7 (2014) Offline Installer Download Links

        Advertise with Anonymous Ads

        Offline Installer Download Links for ESET NOD32 Antivirus 7 (2014) & ESET Smart Security 7 (2014) NOW available for Windows 8, 7, Vista and XP - Languages: English, French and Spanish 
        To find out which operating system do you have please check for the following: 

        Windows XP
        Click on Start, locate My Computer and right click to select Properties from the drop menu.

        Windows Vista 
        Click on Start, locate My Computer and right click to select Properties from the drop menu.

        Windows 7 
        Click on Start, locate My Computer and right click to select Properties from the drop menu. 

        Windows 8 
        Press Windows key + C and click Settings and then click PC info.
        Source : http://blog.anti-virus4u.com/2013/10/eset-7-2014-offline-installer-download.html

        Related Posts:

          Tutorial – Cara Buka Laptop Compaq CQ40

          Advertise with Anonymous Ads


          image


          Dulu sy pernah Buat tutorial cara nak buka laptop compaq V3000, kali saya sediakan tutorial bergambar cara nak buka laptop compaq CQ40.. bagi pengguna CQ40 yang nak bukan dan service laptop sendiri boleh la ikut tutorial ni..
          Peralatan yang diperlukan:
          1- skru driver mata bunga (yg kecik)
          2- berus cat / ape2 berus yg blh buang habuk..huhu

          LANGKAH –LANGKAH

          6 1 2 3 4 5
          7 8 9 10 11 12
          image
          Turn the computer upside down, with the rear toward you.

          Remove the Phillips PM2.0×2.0 broadhead screw (1) from the optical drive bay, the
          Phillips PM2.5×5.0 screw (2) from the hard drive bay, the four Phillips PM2.0×3.0 screws (3) from the battery bay, and the two Phillips PM2.5×10.0 screws (4) from the base enclosure rear corners that secure the keyboard cover to the computer
          image
          image
          Remove the Phillips PM2.5×3.0 screw (1) from the power button board.
          Lift the power button board (2) up and away from the keyboard cover.
          16 17 18
          Remove the wireless antenna cable (1) from the hole in the system board and the routing channels and clips built into the top cover.
          Disconnect the display panel cable (2) that runs along the left side.
          image
          Remove the microphone cable (1) from the hole in the system board and the routing channels and clips built into the top cover.
          Disconnect the microphone cable from the system board (2).


          image
          Remove the wireless antenna cable (1) from the hole in the system board and the routing channels and clips built into the top cover.
          Disconnect the display panel cable (2) that runs along the left side.
          image
          Remove the microphone cable (1) from the hole in the system board and the routing channels and clips built into the top cover.
          Disconnect the microphone cable from the system board (2).
          image
          Step kat bawah ni tak perlu ikut bg yg nak servis FAN je. kalau nak tukar LCD anda kene ikut step bawah ni.
          image
          image
          image
          image
          image
          If it is necessary to replace the display cable, follow these steps:
          a. Peel back the plastic (1) that covers the cable.
          b. Remove the tape (2) that secures the cable to the display.
          c. Unplug the cable (3) from the display.
          d. Remove the cable from the display (4).
          image
          ok sambung blk.. terbalikkan laptop anda dan buka semua skru yg ada pada bahagian bawah.. spt dlm gmbr.
          image
          image
          Disconnect the following cables from the system board:
          ● Bluetooth module cable (1)
          ● TouchPad cable (2) with zero insertion force (ZIF) connector
          image
          Remove the top cover (3).
          image
          Remove the TouchPad button board (5) from the TouchPad bracket
          tak perlu buka bg yg nak service FAN.
          image
          Remove the Bluetooth module (5) from the top cover.
          image
          Remove the modem module.
          image
          Remove the audio board (4).
          image
          Lift the USB board (4) straight up to remove it from the computer.
          image
          image
          image
          Disconnect the power connector cable.

          image
          image
          image
          Remove the heat sink (gantikan thermal paste yang baru)
          image
          tanggalkan dan bersihkan FAN laptop anda..

          Source : http://jomtutorial.blogspot.com/2010/10/tutorial-cara-buka-laptop-compaq-cq40.html

          Related Posts: